

You start up your pride and joy one crisp fall day and find that even though your defrosters are on high, the windshield gets fogged up. There is also a sweet smell in the air and you know it is not your cologne. There may even be a green puddle forming on the passenger's side floorboard. These are all good signs that the heater core has a leak. Luckily new ones are cheap and fairly easy to come by. I will detail some of the finer points of heater core replacement.
Because the heater box has some electrical connections, it is best to remove the negative battery terminal prior to starting this project.
The heater core is hidden inside the box-like structure found under the right side of the dash. In order to replace it, the whole box needs to be dropped out from under the dash. Here is what we are dealing with:
![Image]()
In addition to a new heater core, expect to replace the heater hoses as they are not readily accessible otherwise. Examine the defroster plenum, defroster hoses and vents as they will be fairly easy to replace at this time too. You may also want to get a heater box insulation kit as most of the original foam insulation is in very poor shape after forty plus years of service.
In order to drop the heater box out from under the dash, partially drain the radiator. It should only need to be drained about half way down, just enough so that the main level is below where the bottom heater hose connects to the water pump:
![Image]()
The heater hoses on the water pump and the intake manifold will need to be removed. Mine are practically hidden in this photo:
![Image]()
Here both hoses have been disconnected from the engine:
![Image]()
Be sure to remove the hose clamps as they will be in the way during a following step. If you are planning on replacing both hoses (again, highly recommended), you can save yourself a little aggravation by taking a razor knife and cutting the hoses at the firewall. Once the hoses have been removed and drained as much as possible, place a couple of old towels on the floor boards to protect the carpet from the antifreeze/rust mixture that remains in the heater core.
Look under the dash and unplug the electrical connector found on the front of the heater box, just to the left of the interior light:
![Image]()
Note the orientation of the wires before removal. Here are the spade connectors that the plugs are attached to:
![Image]()
The above wiring block is normally red in color, but this one had been painted black, probably when the dash was repainted a long time ago.
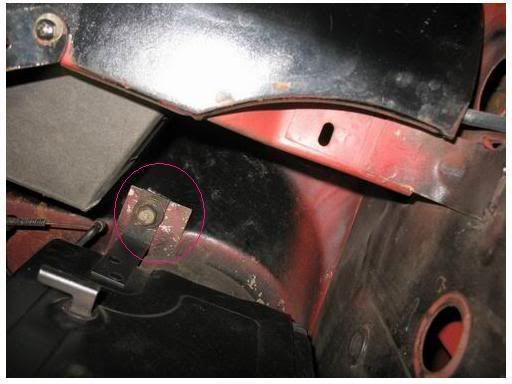
It is now time to remove a few fasteners. The first bolt that I remove is found up under the dash and it is a support for the heater box (circled in red):
![Image]()
Next remove the 4 nuts found in the engine compartment, but first you must disconnect the 2 (or 3 wires) that the power the fan motor, as seen on the right in the picture below:
![Image]()
There are 4 nuts surrounding the heater motor, a couple are seen in the above photo. These nuts are all that hold the heater box securely to the firewall. Remove all 4 nuts, preferably with a helper so the heater box doesn’t fall to the floor. The heater box still cannot be removed from the car as the defroster/heater cables are still attached:
![Image]()
Those cables will need to be removed. Normally there are little metal hats on top of where the cable is wound around the mechanism, but mine are long gone. Be sure to mark the cables in order to help with reassembly.
Next disconnect the defroster hoses from the defroster plenum. Normally there are clamps that need to be removed:
![Image]()
Disconnect the defroster plenum cable. This allow you to remove the plenum with the heater box assembly:
![Image]()
Now you can remove the heater box assembly and take it to a workbench for further disassembly. The heater hoses need threaded through the holes in the firewall.
![Image]()
Remove the hoses from the heater core. Then remove the 4 screws that hold the defroster plenum to the heater box assembly:
![Image]()
It is now time to dissemble the heater box itself. There are several metal spring clips that hold the 2 halves of the box together. I use a screwdriver to remove them, but you must be very careful as the heater box is fiberglass and it is easily broken. The clipping surface can be damaged so the clips will not longer fit. Remove all the clips around the perimeter of the heater box:
![Image]()
![Image]()
Separate the 2 halves and then you will see the heater core. It will have a retainer around it:
![Image]()
![Image]()
![Image]()
Pull the new heater core out of the box and compare to the old one.
![Image]()
Installation will be the reverse of disassembly. Install the heater core into the heater box. Install the core retainer. Then reassemble the heater box using the spring clips. Reattach the defroster plenum (this is a good time to replace that cardboard thing with one of the improved plastic ones.)
Install the heater hoses on the heater core and tighten the clamps:
![Image]()
Note how I oriented the heads of the hose clamps. This makes it easier in the future to loosen the clamps without taking the whole assembly out of the car.
Thread the hoses through the firewall. Install and adjust the 3 heater/defroster cables. Have a helper hold the heater box into position so that you can install the 4 nuts around the heater fan. Connect the wires at the heater fan. From inside the car, install the support bolt, the heater box wiring plugs, and the defroster hoses.
Next reconnect the heater hoses to the engine. Pour the antifreeze back into the radiator and put the battery cable back on the batter. Next start the engine and let it get up to temp. Check for leaks and top off the radiator again as needed.
The above procedure should help familiarize you with the installation of a heater core. This procedure will also be good on other similar small Fords (such as Falcons and Comets) and for other years, assuming that the car does not have in-dash air conditioning.
Because the heater box has some electrical connections, it is best to remove the negative battery terminal prior to starting this project.
The heater core is hidden inside the box-like structure found under the right side of the dash. In order to replace it, the whole box needs to be dropped out from under the dash. Here is what we are dealing with:

In addition to a new heater core, expect to replace the heater hoses as they are not readily accessible otherwise. Examine the defroster plenum, defroster hoses and vents as they will be fairly easy to replace at this time too. You may also want to get a heater box insulation kit as most of the original foam insulation is in very poor shape after forty plus years of service.
In order to drop the heater box out from under the dash, partially drain the radiator. It should only need to be drained about half way down, just enough so that the main level is below where the bottom heater hose connects to the water pump:

The heater hoses on the water pump and the intake manifold will need to be removed. Mine are practically hidden in this photo:

Here both hoses have been disconnected from the engine:

Be sure to remove the hose clamps as they will be in the way during a following step. If you are planning on replacing both hoses (again, highly recommended), you can save yourself a little aggravation by taking a razor knife and cutting the hoses at the firewall. Once the hoses have been removed and drained as much as possible, place a couple of old towels on the floor boards to protect the carpet from the antifreeze/rust mixture that remains in the heater core.
Look under the dash and unplug the electrical connector found on the front of the heater box, just to the left of the interior light:

Note the orientation of the wires before removal. Here are the spade connectors that the plugs are attached to:

The above wiring block is normally red in color, but this one had been painted black, probably when the dash was repainted a long time ago.
It is now time to remove a few fasteners. The first bolt that I remove is found up under the dash and it is a support for the heater box (circled in red):
Next remove the 4 nuts found in the engine compartment, but first you must disconnect the 2 (or 3 wires) that the power the fan motor, as seen on the right in the picture below:

There are 4 nuts surrounding the heater motor, a couple are seen in the above photo. These nuts are all that hold the heater box securely to the firewall. Remove all 4 nuts, preferably with a helper so the heater box doesn’t fall to the floor. The heater box still cannot be removed from the car as the defroster/heater cables are still attached:

Those cables will need to be removed. Normally there are little metal hats on top of where the cable is wound around the mechanism, but mine are long gone. Be sure to mark the cables in order to help with reassembly.
Next disconnect the defroster hoses from the defroster plenum. Normally there are clamps that need to be removed:

Disconnect the defroster plenum cable. This allow you to remove the plenum with the heater box assembly:

Now you can remove the heater box assembly and take it to a workbench for further disassembly. The heater hoses need threaded through the holes in the firewall.

Remove the hoses from the heater core. Then remove the 4 screws that hold the defroster plenum to the heater box assembly:

It is now time to dissemble the heater box itself. There are several metal spring clips that hold the 2 halves of the box together. I use a screwdriver to remove them, but you must be very careful as the heater box is fiberglass and it is easily broken. The clipping surface can be damaged so the clips will not longer fit. Remove all the clips around the perimeter of the heater box:


Separate the 2 halves and then you will see the heater core. It will have a retainer around it:


Pull the new heater core out of the box and compare to the old one.

Installation will be the reverse of disassembly. Install the heater core into the heater box. Install the core retainer. Then reassemble the heater box using the spring clips. Reattach the defroster plenum (this is a good time to replace that cardboard thing with one of the improved plastic ones.)
Install the heater hoses on the heater core and tighten the clamps:

Note how I oriented the heads of the hose clamps. This makes it easier in the future to loosen the clamps without taking the whole assembly out of the car.
Thread the hoses through the firewall. Install and adjust the 3 heater/defroster cables. Have a helper hold the heater box into position so that you can install the 4 nuts around the heater fan. Connect the wires at the heater fan. From inside the car, install the support bolt, the heater box wiring plugs, and the defroster hoses.
Next reconnect the heater hoses to the engine. Pour the antifreeze back into the radiator and put the battery cable back on the batter. Next start the engine and let it get up to temp. Check for leaks and top off the radiator again as needed.
The above procedure should help familiarize you with the installation of a heater core. This procedure will also be good on other similar small Fords (such as Falcons and Comets) and for other years, assuming that the car does not have in-dash air conditioning.

")


