Ford Muscle Cars Tech Forum banner

1966 C6 Build & Rollerization, Part 1-Tear Down

2 reading
19K views 19 replies 9 participants last post by  DesertXL  
#1 · (Edited)
Hi all,

Thought I'd share pics and information on a build up of a 1966 C6 transmission I've recently completed. The intent of this is to show it's really not that bad to rebuild and/or modify a transmission. Hopefully from the plethora of pictures you can get a pretty good idea of whats involved. As always there are seven ways to Sunday to do something. This is just how I did it and is no way meant to be the best.

In this I chose to break this up into 3 major parts/threads and then later a follow up. The first part is just tear down, the second will be the modifications of which if you just wish to do a factory rebuild just skip this section. The third part will be assembly. Later I'll do a follow up once the engine is back from the machine shop and the car reassembled and the transmission shift points and line pressures (quality of shift) are fine tuned.

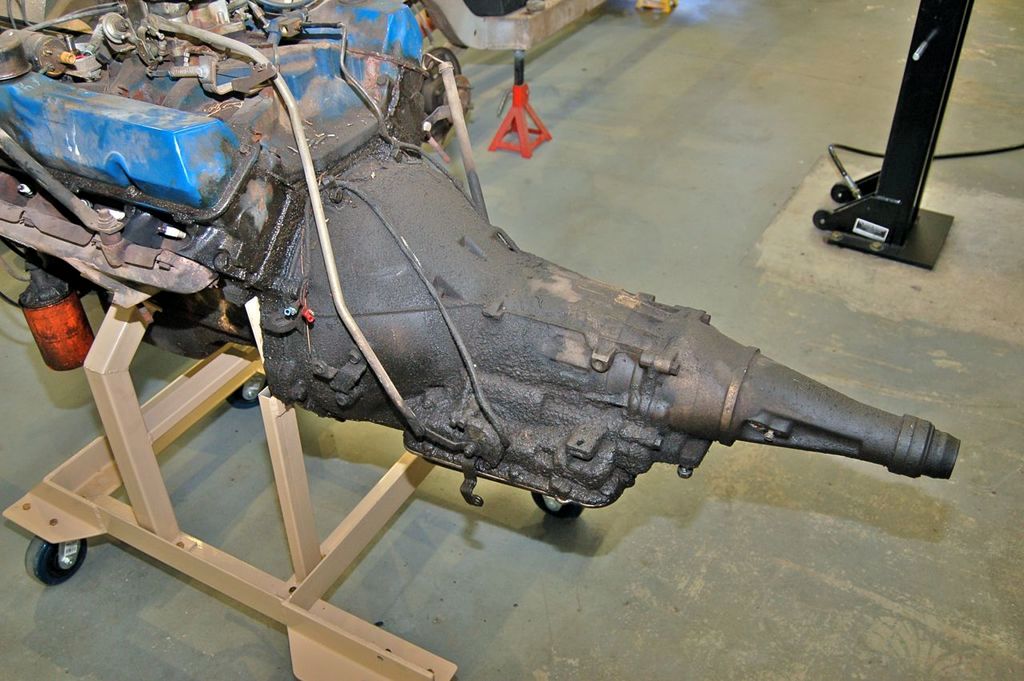
OK enough of all that here's my starting point:

Image


The trans is behind a low horsepower 390 (2bl, single exhaust, "small cam", lower compression, etc) with the technical designation PDD-B model (column shift) 1966 dual range.

Image


First thing I wanted to do was build a proper stand for ease of workability. While you can rebuild one on a bench or I've even seen folks use an old wooden chair with a hole through the seat and the transmission mounted to it, I wanted something just a tinge more elegant and easier to access all sides.

Image


With some scrap pieces of steel from previous projects I was able to contrive this and use my engine stand. It's a bit "Erector Set" looking but worked really well. I even guessed really close on the CG, sans convertor, as it's really easy to spin round.

Image


I've cleaned the transmission at this point and familiarized myself with it and we'll start here with tear down. First off remove the input shaft if it hasn't already fallen out on you. It just pulls out.

Image

Remove the pan.

Image


Remove the valve body, just remove the unfastened bolts shown and it lifts out as one piece.


Image


Actually doesn't look that complex even at this point.

Image


To remove the band forks loosen the jamb nut and the adjuster on the side of the case, the apply forks will then fall free to remove.

Image


The pile of parts slowly grows.

Image


Next remove the bolts holding the pump to the case.

Image


Use a screw driver to push the guts and subsequently the pump forward and remove the pump.

Image


Maneuver the band out through the front.

Image


Pull the High-Reverse clutch (aka direct clutch) forward and out. Use two hands as it's heavy.

Image


Grab the Forward Clutch and pull that out. Again two hands..

Image


Next grab the sun shell and pull that straight out. Note the forward planetary is still in it and will fall out if tipped so be careful or pull that out first and then the shell.

Image


The parts removed in order.

Image


Remove the snap ring holding the reverse planetary onto Low-Reverse clutch hub.

Image


Remove the reverse planetary.

Image


It's hard to see but on the shaft stub against the back hub there is a snap ring holding the reverse ring gear and hub in.

Image


Use snap ring pliers and remove it.

Image


like so

Image


While rotating pull forward on the Low-Reverse clutch hub.

Image


Remove the snap ring holding in the pressure plate, frictions and steels of the Low-Reverse clutch.

Image


And remove them all.

Image


Remove the tail shaft housing.

Image


Grasp the tail tail shaft and pull straight out supporting it as it comes out so you do not damage the governor sleeve.

Image


Remove the governor sleeve

Image


You might have to wiggle and jiggle the sleeve feed and modulated governor tubes free.

Image


Remove the parking gear and its thrust washer.

Image


Remove the kick-down lever nut, lever and shaft.

Image


Remove the neutral-park starter and backup light switch.

Image


Unbolt the manual shift linkage assembly nut and remove the parts.

Image


The parking pawl rod actuator.

Image


And pull the manual shaft out.

Image


Unscrew the vacuum modulator.

Image


Remove the pin the modulator valve from the case.

Image


There's a steel ball bearing holding this band apply pin in place, use a punch to carefully drive the ball forward out the front of the case pump area.

Image


like so

Image


Remove the fulcrum pin and apply lever.

Image


Remove the oil cooler lines from the case as there are O-rings that need to be replaced behind them.

Image


This year C6 has a vent tube, remove it.

Image


Remove the servo from the case.

Image


Remove the parking rod guide plate

Image


As well as the parking pawl and spring.

Image


Very carefully use a punch to drive this pivot shaft down and this will push out the welch plug holding it in.

Image


You can reuse the plug if it comes out without damage.

Image


Use a 1/4" x 20 bolt and screw into the bottom of the pin and pull it out.

Please see the next post to this as I've hit my limit on images.
 
#2 · (Edited)
Re: 1966 C6 Build & Rollerization, Part 1.1-Tear Down

Continued from the first post...


Image


What's left inside is the Low-Reverse Clutch piston, springs, retainer, snap ring and sprag race.

Image


You can use a spring compressor to remove the snap ring, retainer and springs, or if your careful and slowly remove the race bolts evenly you can relieve the spring tension off the piston and remove all the bits easier.

Image


like so.

Image


Remove the plate and springs.

Image


The piston probably will not come out by hand so apply compressed air LIGHTLY to the port and the other hand over the piston. The last thing you want is to launch the piston clear out of the case.

Image


Remove the piston, notice the large area behind the piston it doesn't take much air pressure to develop a large force behind the piston so be careful.

Image


Remove the line and modulator port plugs

Image


Remove the manual shaft seal. Use a blunt screwdriver if you do not feel comfortable in controlling it to avoid scratching the aluminum case.

Image


With the exception of the rear bushings the case is now pretty much empty and can be cleaned.

Image


It'll be important to have a large clean area for all the parts.

Right, so that's the disassembly of the case. I'll cover the clutch packs, pump, valve body in the assembly portion. It's tidy to do each in sections.


See "1966 C6 Build & Rollerization, Part 2-Modification"
 
#6 ·
Desert,
Here is my last roller build:
Rebuilding the c6 in my Galaxie

Your build looks good so far, very clean trans to start with, most of the ones I get into are so trashed and dirty right off the bat.

One thing to mention, that 66 c6 might have been tinkered with before... or at least I've never seen an early c6 with the electronics for the neutral safety switch on the gear selector before.
 
#7 ·
Desert,
Here is my last roller build:
Rebuilding the c6 in my Galaxie

Your build looks good so far, very clean trans to start with, most of the ones I get into are so trashed and dirty right off the bat.

One thing to mention, that 66 c6 might have been tinkered with before... or at least I've never seen an early c6 with the electronics for the neutral safety switch on the gear selector before.
Hi Deeproots,

I did look at your build, nice job indeed! Thank you for the kind words, this transmission was filthy when I started, have a look at the first few pics of post #1 (technically the start of the thread). 49 years of baked on grease and muck. Took me a while to clean it all. I thoroughly cleaned it inside and out first before the pictures. Thought it would be easier to see everything, especially for those not familiar with the C6.

About the park-neutral start-backup lamp switch. It appears to be correct for that year and model. We have four 1966 gals, and the ones with column shift and an FX transmission have the switch mounted onto the the steering column under the dash. The LTD is column shifted with a C6 but has no provision to mount such a switch to the column. Odd they would make two style columns, but I guess they did compared to the other '66 gals. The C4 and C6 utilize the same switch.

Trust me I'd rather have it under the dash as it's not very well sealed from the elements mounted underneath the car.

Cheers
 
#9 ·
Haha, ancient Chinese secret, lol.. no before I embarked on the photo shoot and to familiarize myself with the transmission I had already completely taken it apart and cleaned it all. It helped me get a feel for it and make for better photos.

And for the assembly section, most of it aside from soaking the frictions in ATF was assembled with gobs of clear vaseline, again it makes for better photos.

And you're right, the C6 is just a bigger version of the C4 with the main difference being an integrated rear clutch into the case verses the rear band in the C4. The clutch has more holding power than a band.

Cheers.
 
#11 ·
Having read this all a few notes for those reading this prior to a build of their own:

1. The piston that is in the case for manual first/reverse came out easily for Desert.... for me I've tried pulling it out by hand, I've tried shooting air into it, I've tried filling it with oil and shooting air in, etc, no bueno. I typically have to take two sets of pliers and pull it out while twisting it. I suspect this has to do with the seals in these transmissions being so old and hard. Shooting air in just results in a farting noise and the piston moves 1/16 of and inch.

2. Desert's trans is an early one, the one way clutch race may or may not have a lube hole drilled. The transmission NEEDS one. if you do not know how to drill it, find out, it is essential.

3. Again hers being a 66 trans, it has a ball holding in the shaft which retains the band apply lever. All later ones use a cup plug that is .500 or so. There is a reason Ford changed over to the cup plug, the ball often leaks. If it was me I would also make this update white doing a rebuild.
 
#12 ·
Hi,

Thank you for tip #3, you know I was thinking why did they use a welch plug for the rear parking pin and use a silly ball bearing for a pin in the front. There must have been two different people working on this and they weren't talking :(.

I'll look for a size welch plug I can just add over the ball as its a stepped well.

Again many thanks!
 
#13 ·
Article 988 - Transmission Fluid Leaking From the Intermediate Servo Lever Shaft Hole

TSB #58 - January 27, 1967
(1966 and 1967 Passenger Cars Equipped with the C6 Automatic Transmission)

Complaints of fluid leakage from the frontal area of the C6 automatic transmission have been received from the field. Detailed investigation of complaint units has revealed that transmission fluid was leaking from the intermediate servo lever shaft hole.

The 1/2" diameter ball, used to seal the intermediate servo apply lever shaft hole, has been replaced with a cup plug with improved sealing characteristics to correct this problem. This particular change was effective in transmission production approximately October 5, 1966.

When customer complaints of fluid leakage from the front of the transmission are encountered, the transmission should be carefully inspected to determine the source of the fluid leak.

Should the transmission fluid leak be originating from the intermediate servo lever shaft hole, a cup plug (C7AZ-7E206-A, Class C) should be installed to correct the problem. Following is the recommended installation procedure:

  • 1. With the transmission oil pan removed, drive the servo lever shaft forward approximately 1/2" to dislodge the steel ball. A drift punch is recommended for this operation.
    2. Drive the servo lever shaft back into position in the case.
    3. Apply sealer to the cup plug and install plug in the servo lever shaft hole flush with shoulder of counter bore. Refer to Illus. S1164-A.
    4. Reassemble the oil pan and install transmission in the vehicle.

Image


WARRANTY STATUS - REIMBURSABLE
Oper: Use suggested labor time schedule

operation— 7-7005-A (transmission assembly - remove and install)
 
#15 ·
Nice Buildup and great info . Doing a great job. One thing I will add though for anyone else doing a build , there is no need to remove the park pawl assy /spring/cup plug if just doing a rebuild .
Same for the Servo lever , can stay in place . I usually silicone the hole after the cup plug is in . Stops any mystery leaks .

Good point raised by Deeproots rear the rear roller oiling. The early ones need drilling .

If using a stock #9 thrust the feed can be drilled through to lube it also , but a roller bearing is a good addition .

Off now to part 2 :)
 
#18 ·
You're welcome 1976Kjell,

Happy to help someone else. I'm just glad Photobucket eventually allowed 3rd party free hosting again. As for a time the pictures weren't available and when asked I would steer those interested onto another Ford galaxie website where I mirrored all this information and pictures. That website had servers that did backup all the pictures so they were never compromised by Photobucket's change of policy.

Don't get me wrong, I'm not upset with Photobucket, I mean after all they are a business and don't work for love. Who goes to their boss on payday and say's no thanks keep the paycheck I work freely for the greater good? lol.... no-one... as you'd be living in a cardboard box.

Good luck with your transmission and please feel free to ask any questions.

Cheers
 
#17 ·
Desert,
Great article damn you though. Working on my 7 litre convertible. It’s a barn find. Transmission is leaking onto driveway. No doubt it has bad seals. Contemplating getting the trans rebuilt. I am too anal to just let anyone do it. Always wanted to do it myself, but auto transmissions are and have always been a mystery to me. (Four speed guy!). My trans is the exact same as the one you are building (I think 428 not 390). Was about to try to find a place to do the work and then here is your wonderful article. Now I have to do it.

A few questions first. I noticed you said you cleaned it. I’m thinking king in my mind, how is that possible to get it so clean? Someone asked that question already. You cheated. Lol. Imagine the surprise when someone takes theirs apart and has a huge mess all over!

My questions
Where do you get the rebuild kit? Parts you need? I don’t want to order something and find out this spring, that clutch, or this ball beating is the wrong one. I’ve also heard that parts are running out for those old trans!

How did you clean the outside? Pressure washer? You have a huge parts washer? Chemicals used? Just water? Steam? I know mine is just as bad.

Do you think I need to rebuild my trans, 51k on car, beside leaking it should work.

Keep up the great post please. Can you just make a video, you know, like a TV show? LOL. That really was a joke, but!!!!!

Thanks
JIM
 
#19 ·
Howdy Jim,

Thank you for the kinds words on this older article. OK let me see if I can answer your questions.

First a couple of thoughts on the 1966 C6 and following year C6's. Your C6 in your 1966 galaxie 500 7 litre should be similar in that the only difference may be a calibration change to the valve body and side apply servo as well as have more frictions and steels in the clutch assemblies. The reason why is because the 428 non CJ FE generates more horsepower and torque over a similar RPM range than the base cheesy Y code 390 two of our 66's came with.

The C6 debuted in 1966 and withcidentally was the first and only year C6 with the dual range valve body (green dot, no dot drive ranges). As a result the valve body for the 1966 C6 is unique. The latter years all came with the now familiar PRDN2L.

On the topic of parts availability. The C4 and C6 have a very healthy aftermarket cult following and the only parts you will have trouble finding are parts for the 1966 C6 valve body (The C4 is probably in the same situation). The reason why is that dual range back then was irritating and confusing. Now, it's considered a novelty and some folks think it's the neatest thing.

I built up two of these 1966 C6's for FE's and scoured high and low for the valve body gaskets for 1966. I finally found a place that had several left over in stock (as you can imagine the dust on those) and I bought them all. I don't know if they started reproducing them again. If you can not find them for sale let me know and I will sell you one.

The only other part lately I noticed that is discontinued is the transmission mount for the C4/C6 (same mount) for the 3rd gen Ford full size (65-68). If yours is getting questionable, I would look up the part number and scour sooner rather than later as the prices are going up quickly on remaining stock. Dennis Carpenter still has one or two left on the shelf last time I checked about a month ago. E-Bay prices were approaching 100 dollars a piece for the mount.

Aside from those parts, everything else is available along with all kinds of performance goodies as well for the C6. As for the transmissions that parts are indeed hard to find are the galaxie's with the Borg Warner transmissions in them. These include the FX, MX and FMX. I rebuilt an FMX for a friend last year and after that headache of parts availability I will never do another one. I had two FX transmissions I just threw away as a result.

Another side note that may be interesting is the C6 apparently is one of the worst energy vampire transmissions out there for old American cars. If you have a look at "Part II modification" I give some references to this statement that you can explore if you're so inclined. Basically put, the C6 take a large chunk of energy from the engine and turns it into heat rather than pass it onto the rear wheels. There are ways to mitigate this as Part II demonstrates. You can buy the kits rather than machine yourself. But I digress, like I mentioned if interested please feel free to read part II.

OK now to direct questions;

How did I get it so clean? :rolleyes: Those wonderful Keebler Elves. haha. I cleaned it via an unconventional manner. Mainly walnut blasted and solvent. If you're going to try walnut blasting you have to be extremely judicious in making sure you do not get any leftover in the passages. Do not walnut the pump stator assembly, use solvent only as there are pressure relief springs and balls inside and can trap walnut. The walnut will eventually dissolve in hot ATF but you risk causing damage to the transmission if pressures aren't right because of contamination.

For the person attempting this on their own without a parts washer or walnut blaster, I would recommend once taken apart, take a picture of all the parts you have to be cleaned and take them to a trans shop, they have an industrial high temp parts washer than can clean the case, stater and whatever else you might have. Sure you can buy upteen cans of brake clean and do the same thing, but it's cheaper and easier to let the trans place clean them for you.

Part sources, you asked where I shopped around. My answer may not be a straight forward one as I rollerized the C6's myself (did the machine work at home) so I had to shop around quite a bit to get everything I needed, including the aforementioned 1966 only valve body gasket. If you're doing a bog standard rebuild (no modification) then you should be able to get what you need from places like E-Bay or Rock Auto or even your local auto parts store.

Again the only caveats will be a valve body gasket and your torque converter. If you decide to go with higher quality frictions, like Red Eagle, you will need a higher count forward clutch spline as the 1966 only uses a lower count spline. (see Part II for more details). However the stock friction replacements will fit fine, but you have to make sure it's 1966 only. Don't buy the kits that say 1967 --->, that's why they say 1967 and up.

On the topic of torque converters. Never reuse your old one. The amount of sludge that gets centrifugally deposited and baked on the inside of one is something you do not want polluting your freshly cleaned unit. I wouldn't trust those places that "clean" your torque converter without cutting it open, replacing the bushing, checking the one way clutch and fins, then welding and balancing it back up.

One of the places I used is PATC transmissions. They will do an exchange on your torque converter and they not only clean it but they will rollerize it for your as well as adjust the stall speed if you like. I had this done because I built up the pud stock 390 (now eclipses 500 hp). If you're curious about what I chose and why, here's the answer. I wanted a car that if driven normally feels like I'm driving my Grand Marquis, smooth, quiet and no jolting of shifts. However put your foot down and it's so not like a Grand Marquis. Using the large standard diameter torque converter gives you a tight coupling like a standard production car, but under load the engine RPM's will flash up to the new stall speed installed and now the engine is in it's power band and you're getting the benefit of torque multiplication from the converter.

If you're going to modify a car for increased performance it has to be a complete modification from one end to another for the results to really show. I have no wish to mislead anyone. Simply rollerizing a transmission and upping the torque converter stall speed will not make their car a ravenous monster on the road, it will help though, but the outcome may not justify the money spent.

The last question I believe is in regards to needing to be rebuilt given such low miles. Well the answer is probably as it's not just miles that lead to problems is the age of the rubber seals internally and externally.

Here's a few examples from my own experience. One of our field find '66 galaxie 500's I was able to get running and driving. It had been sitting since the early 70's outside abandoned.

One day I thought well I treat the transmission to a filter and fluid change. Mistake 1-20. The seals were rock hard in the transmission and it was the sludge from the brown gooey liquid presenting itself as ATF that was making the transmission still work and shift. I changed the fluid and filter and that was it, wouldn't move. Stick a fork in it it's done.

This transmission featured here in this article is out of our 1966 LTD and that car sat in a garage since the early 80's unused. I did get it running and took it for a little spin. Little did I know, that even though the ATF was still pink, the seals in the forward clutch were like a pretzel and couldn't hold pressure and it was starting to slip and burn, as evidenced when I took it apart the seal just kept breaking like thin glass.

The last example is my own Caprice Classic. I rebuilt the Turbo 400 25 years ago. Now the car gets driven every year but not terribly much. I think in 25 years there's about 25 thousand miles on the transmission. This was the first transmission I have ever done. Anyway this spring (cold mornings) I noticed there's no reverse when cold. Fluid is pink and topped off, as soon as it warms up, it works. But this car (cared for since I've owned it) needs new seals even after 25 years as I would venture they are getting hard and cant' seal.

You have to be extremely careful when a transmission starts slipping, when that happens it only takes moments of slipping under power to generate enough heat to start damaging higher dollar parts internally.

As for my Caprice Classic, its Th-400 only needs 35 dollars worth of a seal kit. But it's a big long tail cantankerous Th-400 (factory 454 car) like the galaxie's C6 and it's loads of work and time to change all the seals, however wait and you might be in for more parts due to heat damage from slipping that may or may not be apparent.

I apologize for the long diatribe, but there's a lot of esoteric ideas and avenues to consider when rebuilding a transmission.

Good luck and feel free to ask any more questions.

Cheers
 
#20 · (Edited)
One last thought about cleaning and rebuilding the worst of transmissions.

As mentioned above I built up another 1966 C6 for an FE that was possibly not even worth it, but I did it anyway. I joke and call it the it the internal combustion C6. It literally had flames coming out the dipstick tube and there was ashes on the inside of the transmission.

The amount of work and parts needed was staggering, but if I can resurrect this thing, you can rebuild just about knackered transmission.

Here's the link to that nightmare, the post isn't as well structured as this C6 post is, bounced around a bit, but the pictures are there for comical reasons if nothing else.

This C6 is for the 1966 galaxie 500 XL with the factory floor shifter, just like the 7 litre model has.

https://www.fordmuscleforums.com/ga...com/galaxie-pages/610010-1966-galaxie-500xl-fixer-upper-thread.html#post2402465

Have a laugh at this P.O.S., I did.

;)